Embroidery pull compensation is one of the most important settings in professional embroidery digitizing. A design can look perfect on a computer screen yet stitch with narrow satin columns, gaps between colors, distorted circles, uneven lettering, or outlines that no longer line up.
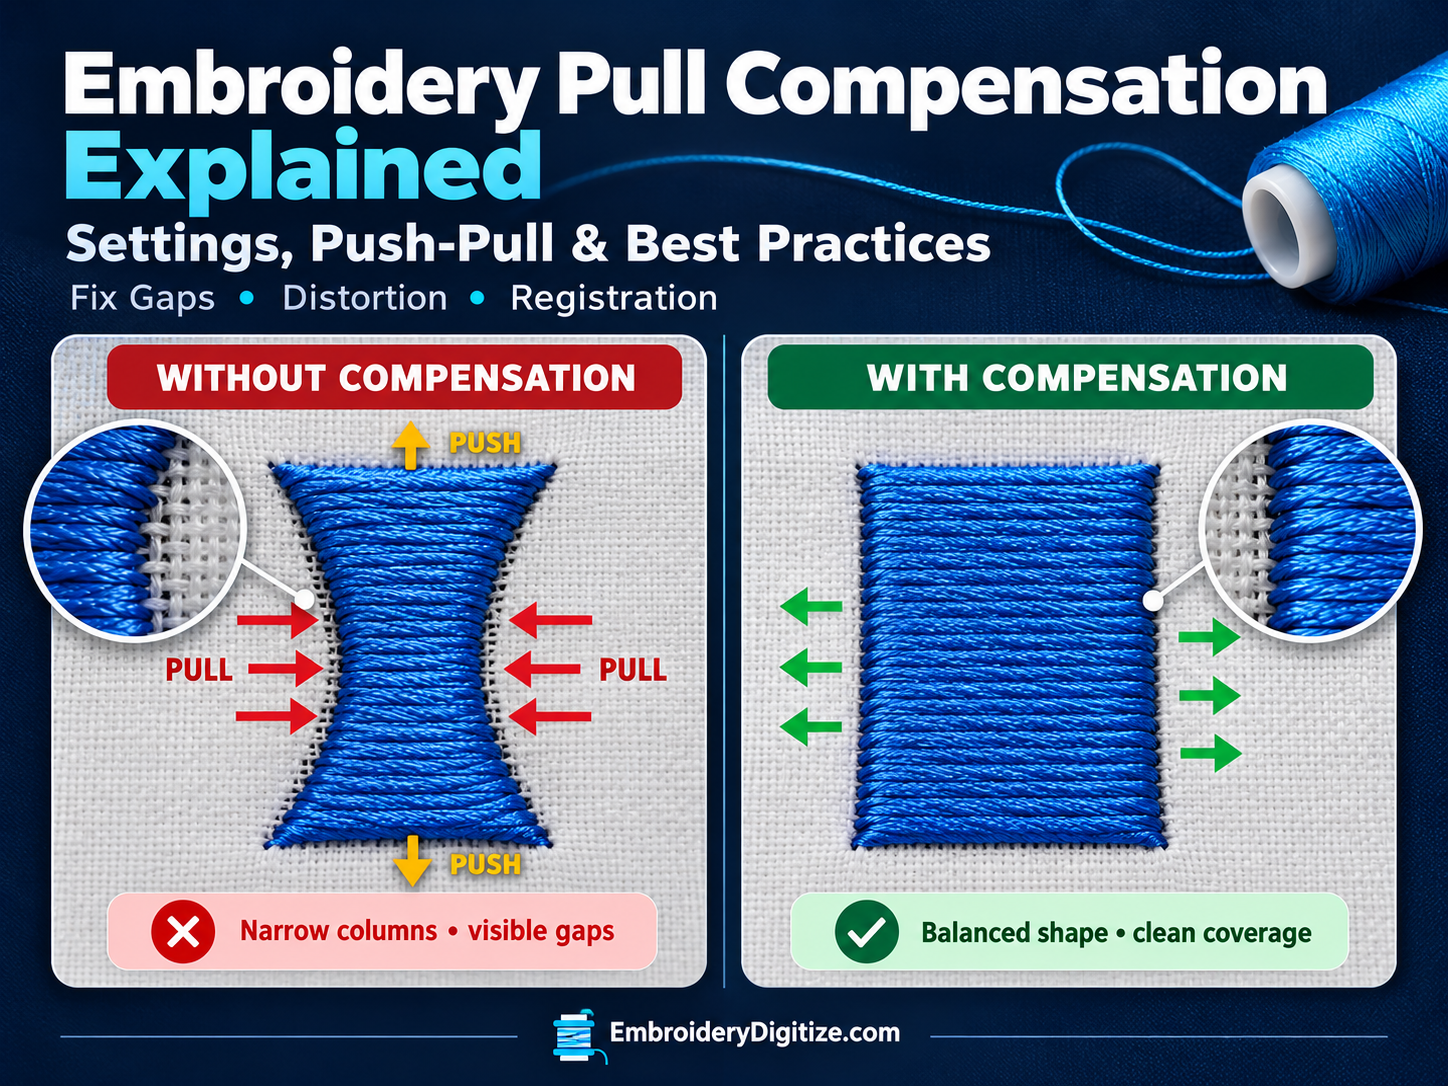
The reason is simple: embroidery thread and fabric physically interact with each other. As stitches are formed, thread tension can pull the fabric inward across the width of a stitched area while stitch buildup can push the fabric outward in the direction of the stitches.
A professional digitizer anticipates this movement before the design reaches the embroidery machine.
Quick Answer: What Is Pull Compensation in Embroidery?
Pull compensation is a digitizing adjustment that makes an embroidery object slightly wider than its original artwork so that it finishes at the correct size after thread tension pulls the stitches inward.
It is especially important for satin stitches, small lettering, circles, outlines, logos, knit fabrics, caps and designs where multiple embroidered objects must line up accurately.
What Is Embroidery Pull Compensation?
Pull compensation is the process of intentionally extending the width of an embroidered object to compensate for the narrowing that occurs during stitching.
When a satin column is stitched, for example, the thread travels from one side of the column to the other. Thread tension pulls those two edges toward the center. If the digitized column is exactly the same width as the artwork, the finished embroidery may appear narrower than expected.
A digitizer compensates by slightly increasing the width of the embroidered object.
The object may therefore look slightly oversized in embroidery software, but after stitching it can settle into the intended shape.
This is why embroidery should not simply be treated like printing. With printing, the artwork is placed directly onto a surface. With embroidery, thousands of needle penetrations, thread tension, stitch direction, fabric stretch and stabilizer all affect the finished result.
Push vs. Pull in Embroidery: What's the Difference?
The terms push and pull describe two different forms of distortion.
| Effect | What Happens | Typical Result |
|---|---|---|
| Pull | Thread tension pulls the sides of the embroidery inward. | Columns become narrower and gaps can appear. |
| Push | Stitch buildup can extend the design in the direction of the stitches. | Shapes may become longer or outlines may shift. |
A satin rectangle provides a simple example.
The two sides perpendicular to the stitch direction tend to pull inward, while the ends of the column may extend outward.
This means a perfectly shaped object on screen may not remain perfectly shaped after embroidery.
Example: Why an Embroidered Circle Can Become an Oval
Imagine digitizing a perfectly round circle using satin stitches.
The stitches pull across the width of the object. That tension changes the shape while the design is being sewn. Without proper compensation, the finished circle may appear slightly oval or flattened.
A skilled digitizer adjusts the object shape, stitch direction, underlay and compensation so the stitched result looks round rather than simply making the digitized outline mathematically perfect.
Why Is Pull Compensation Important?
Correct pull compensation can help prevent several common embroidery problems:
- Visible gaps between adjacent colors
- Narrow or weak satin columns
- Fabric showing along the edge of a fill
- Misaligned borders
- Poor registration between objects
- Uneven embroidered lettering
- Distorted circles and curved objects
- Thin outlines that disappear
- Patch borders that fail to cover the edge
- Logos that look different from the original artwork
Pull compensation becomes even more important when working with flexible fabrics such as knits, performance wear, polo shirts and fleece.
Embroidery Pull Compensation Settings
There is no single pull compensation value that works for every embroidery design.
The correct amount depends on:
- Fabric type
- Fabric stretch
- Stitch type
- Stitch direction
- Object width
- Thread type
- Stitch density
- Underlay
- Stabilizer
- Machine tension
- Hooping quality
- Design size
For this reason, pull compensation values should be treated as starting points for testing rather than universal rules.
Practical Starting Ranges
Many embroidery programs express pull compensation in millimeters. The following ranges can be used as conservative starting points when testing a design:
| Material / Situation | Possible Starting Range | Notes |
|---|---|---|
| Stable woven fabric | 0.15–0.25 mm | Usually requires less compensation. |
| Piqué / polo fabric | 0.20–0.35 mm | Texture and movement may require additional support. |
| Stretch knit | 0.30–0.45 mm | Good stabilization and underlay are especially important. |
| Fleece / soft fabric | 0.30–0.50 mm | Fabric loft and movement must also be controlled. |
| Small satin lettering | 0.15–0.30 mm | Avoid excessive compensation that closes small counters. |
Important: these values are test ranges, not fixed production standards. Embroidery software may calculate or display compensation differently, and two fabrics that look similar can behave differently on the machine.
Always sew a sample on the actual or closely matched production fabric before approving a design.
How Fabric Changes Pull Compensation
Fabric is one of the biggest factors affecting embroidery distortion.
Stable Woven Fabric
Materials such as canvas and other firm woven fabrics usually move less during embroidery.
They may therefore require relatively modest compensation compared with stretchy garments.
Polo and Piqué Shirts
Piqué has texture and more movement than a firm woven material. Satin columns and small text can sink into the surface or pull inward.
A suitable underlay, stabilizer and moderate compensation are often required.
T-Shirts and Stretch Knits
Knits can stretch as embroidery is sewn. Increasing pull compensation alone is not enough.
You should also consider:
- Proper cut-away stabilizer
- Correct hoop tension
- Suitable underlay
- Reasonable stitch density
- Shorter and controlled stitch lengths where needed
Trying to solve an unstable knit only by adding extreme compensation can create thick or oversized embroidery.
Fleece and Towels
Fleece and terry fabrics add another problem: surface loft.
Stitches can sink into the material, making narrow details appear even smaller.
In addition to compensation, you may need stronger underlay and appropriate topping to keep stitches visible above the fabric surface.
Pull Compensation by Stitch Type
Different stitch types react differently to tension.
Satin Stitch
Satin stitches usually show pull very clearly because each stitch travels across the width of a column.
Without enough compensation, a satin column may:
- Become too narrow
- Expose the fabric at its sides
- Create gaps against neighboring objects
- Lose the intended shape of lettering
Satin objects therefore require careful attention to width, underlay, density and compensation.
Tatami or Fill Stitch
Tatami fills distribute stitches across a larger area using multiple rows.
Pull still occurs, particularly on large fills, but the effect may be less visually obvious than on narrow satin columns.
Large fills also create more overall fabric stress, so stitch direction and sequencing become important.
Running Stitch
A running stitch does not require pull compensation in exactly the same way as a satin or fill object because it does not create a wide filled column.
However, fabric movement can still affect its position.
This is why a thin running-stitch outline added around a large fill can appear misregistered even when the outline itself was digitized correctly.
Pull Compensation for Small Embroidery Lettering
Small text is one of the areas where poor compensation becomes immediately visible.
A letter that looks correctly proportioned on screen may sew too thin because the satin columns contract.
For example, vertical stems in letters such as:
- H
- N
- M
- E
- R
may need enough compensation to remain visible and balanced after stitching.
Rounded letters such as:
- O
- C
- G
- Q
also require careful shaping because curves can visually change after push-pull distortion.
Don't Fix Small Text With Compensation Alone
If lettering is too small for the chosen font and fabric, increasing compensation will not magically make it sew cleanly.
You may also need to:
- Increase the letter size
- Use a simpler embroidery font
- Increase narrow column widths
- Open small counters
- Reduce unnecessary detail
- Adjust stitch density
- Improve underlay
For more information about preparing artwork and dimensions, read our Embroidery Design Sizing & Placement Guide.
Pull Compensation When Digitizing Logos
Logo embroidery often combines several different object types:
- Small lettering
- Satin borders
- Filled shapes
- Fine outlines
- Overlapping colors
- Small icons
Each element may require different compensation.
Using the same setting across the entire logo can create inconsistent results.
Example
Suppose a company logo contains a blue fill with a white satin outline.
If the blue fill pulls inward during stitching, a small gap may appear between the blue area and white border.
A professional digitizer might solve the issue by combining:
- Correct pull compensation
- Slight object overlap
- Better stitching sequence
- Suitable underlay
- Improved stitch direction
The solution is not simply to make every object larger.
For the complete logo workflow, see How to Digitize a Logo for Embroidery: Step-by-Step Guide.
Pull Compensation for Embroidery Patches
Patch digitizing requires especially accurate registration because the satin border must cover and secure the edge of the patch.
If the interior fill pulls inward too much, unwanted gaps can appear near the border.
If the border itself is too narrow or poorly compensated, the patch edge may remain visible.
A professional patch file normally balances:
- Fill direction
- Edge overlap
- Satin border width
- Underlay
- Compensation
- Stitch sequence
Learn more in our complete embroidery patch digitizing guide.
Pull Compensation for Caps and Hat Embroidery
Caps create unique embroidery challenges because the embroidery is sewn on a curved, structured surface.
Designs are commonly digitized to sew from the center outward so that material movement is controlled instead of trapped toward the middle.
Push-pull distortion can affect:
- Small cap lettering
- Center logos
- Wide satin columns
- Borders
- Designs crossing the curved front panels
Compensation must work together with proper sequencing and underlay.
Read our detailed Hat Embroidery Digitizing Guide for more information about caps, beanies and headwear.
How Underlay Affects Pull Compensation
Underlay and pull compensation perform different jobs, but they work together.
Pull compensation adjusts the shape or width of the top embroidery.
Underlay creates a foundation that stabilizes the fabric and supports the top stitches.
Good underlay can reduce fabric movement and help the top stitches maintain their intended shape.
Common underlay types include:
- Center run
- Edge run
- Zigzag
- Double zigzag
- Tatami underlay
For example, an edge run can help define and stabilize the edges of a satin column, while zigzag underlay can provide broader support underneath wider satin areas.
If you want a detailed explanation of each type, read Embroidery Underlay Explained: Types, Settings & Best Practices.
Pull Compensation vs. Stitch Density
Pull compensation and stitch density are often confused, but they control different things.
| Setting | Purpose |
|---|---|
| Pull Compensation | Compensates for the narrowing or distortion of stitched objects. |
| Density | Controls how closely stitches are placed together. |
| Underlay | Creates a supporting foundation below the visible stitches. |
| Stabilizer | Supports the fabric from underneath during embroidery. |
Adding more density is not a proper substitute for pull compensation.
In fact, excessive density can increase fabric stress and make distortion worse.
How Pull Compensation Helps Fix Embroidery Registration Problems
Registration refers to how accurately different parts of an embroidery design align with each other.
Poor registration may appear as:
- White fabric showing between colors
- Outlines shifted away from filled objects
- Borders not covering the intended edge
- Eyes, text or small details appearing out of position
- Multiple color sections failing to meet cleanly
Pull compensation can help, but registration problems may have several causes.
Before Increasing Compensation, Check:
- Hooping: Is the garment secured correctly?
- Stabilizer: Is it strong enough for the fabric and design?
- Underlay: Is the design adequately supported?
- Density: Is the design creating excessive fabric stress?
- Sequence: Are objects sewing in an order that minimizes movement?
- Stitch direction: Are large areas pulling against each other?
- Machine tension: Is excessive thread tension distorting the fabric?
- Compensation: Are object edges wide enough after stitching?
A professional result usually comes from balancing all of these factors rather than relying on one setting.
7 Common Pull Compensation Mistakes
1. Using the Same Setting for Every Fabric
A value that works on stable canvas may not work on a stretchy performance shirt.
Adjust the design for the actual production material.
2. Adding Too Much Compensation
More is not always better.
Excessive compensation can create:
- Bulky edges
- Closed letter openings
- Overlapping colors
- Oversized borders
- Distorted small details
3. Trying to Fix Bad Stabilization With Compensation
If the fabric is moving excessively, increasing compensation only hides part of the problem.
Fix stabilization first.
4. Ignoring Stitch Direction
Push and pull occur relative to stitch direction.
Changing stitch angles can change the way the same shape distorts.
5. Ignoring Underlay
An unsupported satin column may continue to distort even after additional compensation is applied.
6. Judging Only From the Computer Preview
A realistic software preview is useful, but it cannot perfectly reproduce every combination of fabric, tension, backing, needle and machine.
A physical sew-out remains essential for important production work.
7. Scaling a Finished Design Without Checking It
Embroidery files are not infinitely scalable.
When a design is made substantially larger or smaller, satin widths, density, underlay, stitch lengths and compensation may all need to be reviewed.
Professional Pull Compensation Test-Sew Workflow
Use this process when testing a new embroidery design.
Step 1: Identify the Production Fabric
Determine whether the design will be sewn on a polo, cap, hoodie, jacket, towel, patch material, T-shirt or another product.
Step 2: Choose the Correct Stitch Types
Decide which objects should use satin, fill or running stitches.
Step 3: Add Appropriate Underlay
Support the top stitches according to the object width and fabric.
Step 4: Apply Initial Pull Compensation
Use a moderate value appropriate for the material and object type.
Step 5: Check Overlaps and Registration
Where two colors must meet, allow appropriate overlap so minor fabric movement does not create a visible gap.
Step 6: Sew a Physical Sample
Use the intended thread, stabilizer and fabric whenever possible.
Step 7: Inspect the Result
Look closely at:
- Satin width
- Letter clarity
- Color gaps
- Outline alignment
- Circles and curved shapes
- Fabric puckering
- Border coverage
Step 8: Adjust Individual Objects
Do not automatically increase compensation across the entire design.
Correct only the objects that need adjustment.
Step 9: Test Again
Repeat the sew-out until the design is production ready.
Professional Digitizing Tip
The best embroidery file may look slightly unusual in wireframe view because a digitizer is designing for the finished stitched result, not simply tracing the original artwork exactly.
That is an important difference between professional embroidery digitizing and basic image conversion.
Pull Compensation for Different Embroidery Jobs
| Embroidery Job | Main Concern | What to Check |
|---|---|---|
| Small logo | Thin elements disappearing | Satin width, compensation, underlay |
| Lettering | Narrow stems and closed counters | Font, size, compensation, density |
| Patch | Border coverage | Overlap, border width, registration |
| Cap logo | Movement on curved surface | Sequence, center-out sewing, underlay |
| Polo shirt | Fabric texture and movement | Backing, underlay, compensation |
| Stretch garment | High fabric movement | Cut-away backing, density, underlay, pull compensation |
Can Embroidery Software Automatically Calculate Pull Compensation?
Many professional embroidery digitizing programs include automatic pull compensation tools or fabric presets.
These features can provide a useful starting point, but automatic settings cannot replace a production test.
The software does not always know the exact:
- Garment construction
- Fabric stretch
- Hooping method
- Stabilizer being used
- Thread tension
- Machine setup
- Final production conditions
For that reason, professional digitizers frequently adjust individual objects after examining a real sew-out.
Why Professional Embroidery Digitizing Matters
Creating an embroidery file involves much more than converting JPG, PNG, PDF or vector artwork into DST, PES or another machine format.
A production-ready design requires decisions about:
- Stitch type
- Stitch direction
- Density
- Underlay
- Pull compensation
- Push compensation
- Stitch sequencing
- Trims
- Travel stitches
- Fabric type
- Final design size
If you are new to the process, start with our Embroidery Digitizing Services Guide or our guide explaining why embroidery digitizing is required.
If you already have an embroidery file but need another machine format, you can also use our Free Embroidery Format Converter to learn how to convert DST, PES, JEF, VP3 and many other embroidery formats.
Frequently Asked Questions About Embroidery Pull Compensation
What is pull compensation in embroidery?
Pull compensation is a digitizing adjustment that slightly increases the width of an embroidery object to offset the narrowing caused by thread tension during stitching.
Why does embroidery pull inward?
Thread tension between needle penetrations pulls the fabric and stitches toward each other. The amount of movement depends on fabric, stitch type, density, underlay, backing, tension and other production factors.
What is push and pull compensation in embroidery?
Pull describes the narrowing that occurs across the width of stitched objects, while push describes extension in the direction of the stitches. Digitizers adjust object dimensions, stitch direction and other settings to compensate for both effects.
What pull compensation setting should I use?
There is no universal setting. Stable woven materials may need relatively little compensation, while stretchy knits may require more. Start conservatively and confirm the value with a test sew-out.
Does satin stitch need pull compensation?
Yes. Satin stitches are particularly affected by pull because the stitches repeatedly travel across the width of a column. Proper compensation helps maintain the intended width.
Does tatami fill need pull compensation?
Tatami fill can also be affected by fabric movement and pull, especially in large filled areas. The required adjustment depends on the fabric, stitch direction, underlay and design.
Can too much pull compensation cause problems?
Yes. Excessive compensation can produce bulky edges, overlapping colors, distorted small lettering and closed spaces inside letters.
Can pull compensation fix embroidery gaps?
It can help when gaps are caused by objects pulling inward. However, gaps may also result from poor stabilization, insufficient overlap, bad sequencing, excessive density, hooping problems or machine tension.
Is pull compensation the same as underlay?
No. Pull compensation adjusts the width or shape of the top embroidery. Underlay creates supporting stitches underneath the visible embroidery to stabilize the fabric and support the top stitches.
Why does my embroidery outline not line up?
Fabric movement, push-pull distortion, stitch direction, density, sequencing, hooping and stabilizer can all cause an outline to shift. The complete design should be evaluated rather than simply moving the outline.
Why does embroidery lettering become thinner after stitching?
Thread tension can pull satin columns inward, making letter stems narrower than they appeared on screen. Correct compensation, adequate column width, suitable underlay and an embroidery-friendly font can improve the result.
Should I use more pull compensation on stretchy fabric?
Stretchy fabrics often require more compensation than stable woven fabrics, but compensation should be combined with proper stabilizer, hooping, underlay and density control.
Do embroidery files need to be test stitched?
For reliable production, yes. A physical sew-out shows how the actual combination of fabric, thread, stabilizer, machine tension and digitizing settings behaves.
Final Takeaway
Pull compensation is the small adjustment that can make a major difference between embroidery that merely looks correct on screen and embroidery that actually stitches correctly on fabric.
The most important rule is not to search for one perfect compensation number. Instead, consider the complete embroidery system:
- Fabric
- Stitch type
- Underlay
- Density
- Stitch direction
- Stabilizer
- Machine tension
- Object size
- Sequencing
Apply compensation intelligently, sew a physical sample, inspect the result and make object-specific adjustments where necessary.
That process produces cleaner lettering, stronger satin columns, better registration, smoother borders and more professional embroidery.
Need a Logo Digitized for Embroidery?
Professional embroidery digitizing converts your artwork into a machine-ready stitch file while accounting for stitch type, density, underlay, pull compensation, sequencing and the final garment.
Prepare your artwork using our logo digitizing guide, or learn what to expect before ordering with our complete embroidery digitizing services guide.