When a finished embroidery design looks smooth, stable, and professionally stitched, one of the most important parts of the design may be completely hidden.
That hidden foundation is called embroidery underlay.
Underlay stitches are sewn before the visible top stitches. They help stabilize the fabric, support satin and fill stitches, improve coverage, define edges, and reduce distortion during embroidery.
Choosing the wrong underlay—or using no underlay when it is needed—can cause puckering, gaps, uneven borders, sinking stitches, distorted lettering, and poor registration.
In this guide, we'll explain the main types of embroidery underlay, when to use each one, how fabric affects your settings, and how professional digitizers choose the right foundation for logos, lettering, patches, and other embroidery designs.
What Is Underlay in Embroidery?
Embroidery underlay is a layer of stitches placed underneath the visible embroidery.
These stitches are normally hidden once the final satin, fill, or decorative stitches are sewn over them.
Think of underlay as the foundation of a building. The customer usually never sees it, but it plays an important role in the stability and appearance of the finished design.
Underlay can help:
- Stabilize fabric before the main embroidery is stitched
- Reduce fabric movement and distortion
- Help satin stitches maintain clean edges
- Prevent top stitches from sinking into textured fabric
- Create better embroidery coverage
- Support wider satin columns
- Improve the appearance of lettering
- Reduce gaps between adjoining embroidery objects
- Create additional lift and dimension
Underlay is only one part of creating a production-ready embroidery file. Stitch density, stitch direction, pull compensation, sequencing, fabric type, stabilizer, and design size must also work together.
If you're new to embroidery digitizing, read our step-by-step guide to digitizing a logo for embroidery.
Main Types of Embroidery Underlay
Different embroidery objects require different foundations. A tiny satin letter does not need the same underlay as a large satin border or a wide filled logo.
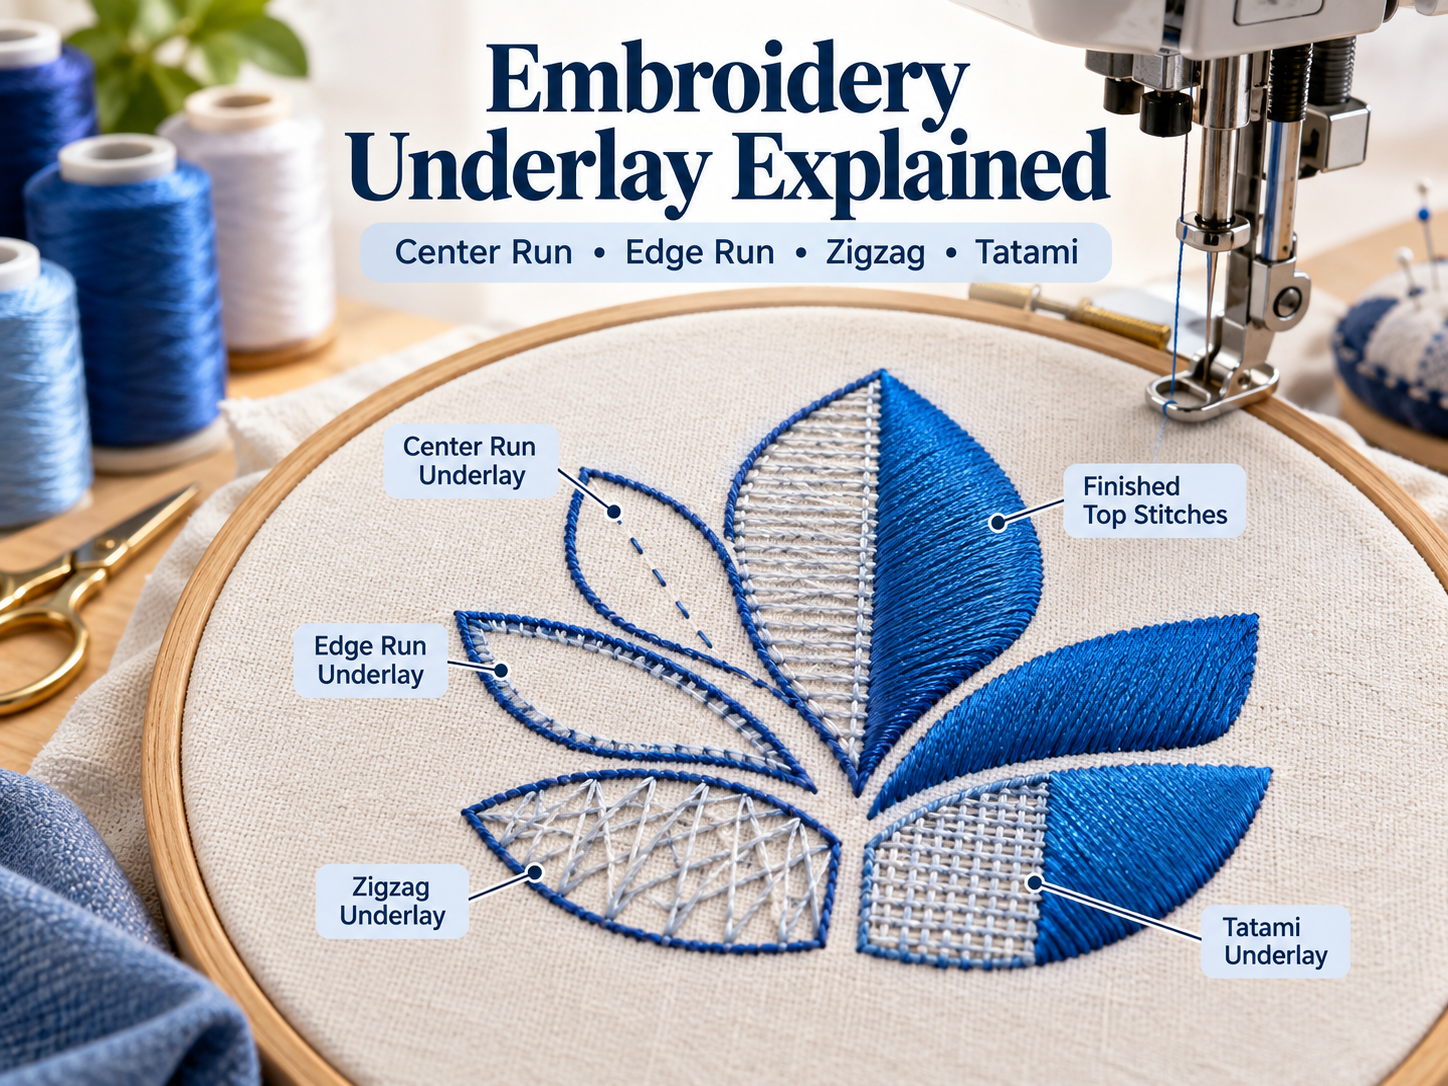
The most common underlay types include:
- Center Run Underlay
- Edge Run Underlay
- Zigzag Underlay
- Double Zigzag Underlay
- Tatami or Fill Underlay
1. Center Run Underlay
A center run underlay places a line of running stitches approximately through the center of a satin column.
It is commonly used for relatively narrow satin objects where a heavier underlay would create unnecessary bulk.
Center Run Is Commonly Used For:
- Small lettering
- Narrow satin columns
- Thin borders
- Fine logo details
- Small decorative elements
The center run helps hold the fabric in position before the satin stitches are placed over it.
For very small embroidery lettering, adding too much underlay can create more problems than it solves. Additional stitches may make the design too dense, particularly when letters are extremely small.
Professional digitizers therefore adjust underlay according to the actual letter size, fabric, thread, and satin-column width rather than applying the same setting to every object.
2. Edge Run Underlay
An edge run underlay follows near the inside edges of an embroidery object.
Its purpose is to create a more defined foundation around the perimeter before the top stitches are sewn.
Edge Run Can Help With:
- Cleaner satin edges
- Better shape definition
- Reducing fabric movement
- Supporting outlines and borders
- Improving embroidery on stretchy fabrics
Edge run underlay is frequently combined with another underlay type when additional support is required.
For example, a wide satin column may use an edge run together with zigzag underlay.
3. Zigzag Underlay
Zigzag underlay creates a loose zigzag foundation underneath satin stitches.
It provides more support than a simple running stitch and is especially useful when the satin column becomes wider.
Zigzag Underlay Is Commonly Used For:
- Medium to wide satin columns
- Bold embroidered lettering
- Logo borders
- Patch borders
- Design elements needing additional lift
The zigzag stitches help support the visible satin stitches while keeping the underlay significantly less dense than the top embroidery.
A common combination is:
Edge Run + Zigzag + Satin Cover Stitch
This combination can provide both edge definition and internal support.
4. Double Zigzag Underlay
Double zigzag underlay provides a stronger foundation than a single zigzag.
It may be useful for larger or heavier satin objects where additional support and loft are needed.
However, additional underlay also means additional stitches.
Using double zigzag everywhere can make embroidery unnecessarily stiff, dense, and heavy. It should be chosen because the particular object requires it—not simply because more stitches seem better.
5. Tatami or Fill Underlay
Tatami underlay creates a light fill-style foundation underneath a larger embroidery area.
It can help stabilize larger shapes and create a consistent base before the final fill stitches are sewn.
Tatami Underlay May Be Useful For:
- Large filled areas
- Complex embroidered logos
- Areas requiring additional fabric stabilization
- Textured materials
- Large embroidery objects requiring a stronger foundation
Because tatami underlay covers a larger area, it normally uses much more open spacing than the visible top fill.
The purpose is to create support—not another complete dense fill underneath the design.
Embroidery Underlay Comparison
| Underlay Type | Best For | Main Purpose |
|---|---|---|
| Center Run | Small lettering and narrow satin columns | Basic stabilization with minimal bulk |
| Edge Run | Satin borders, lettering and outlines | Defines edges and stabilizes shape |
| Zigzag | Medium and wide satin columns | Supports satin stitches and adds lift |
| Double Zigzag | Heavy or wide satin elements | Provides stronger support and additional loft |
| Tatami | Large fill areas | Creates a stable foundation across a larger area |
How Fabric Type Affects Embroidery Underlay
There is no single underlay setting that works perfectly on every fabric.
The same embroidery design can behave very differently on denim, cotton, fleece, polo shirts, towels, caps, jackets, and stretchy performance garments.
Stable Woven Fabrics
Materials such as firm cotton, twill, canvas, and some types of denim generally move less during embroidery.
These fabrics may require less aggressive underlay than highly stretchy or textured materials.
Stretchy Knits and Polo Shirts
Knit fabrics can stretch and distort as stitches are added.
Underlay becomes particularly important because it helps anchor the material and create a stable surface for the top stitches.
Edge-run and supporting underlays can be useful for these applications depending on the design.
Fleece and Towels
Textured and high-pile materials create another challenge: embroidery stitches can sink into the fabric.
A suitable underlay helps create separation between the fabric surface and the finished embroidery.
Depending on the design, topping material may also be used during production to help keep embroidery stitches above the fabric pile.
Caps and Headwear
Caps have different construction characteristics from flat garments.
The shape, seams, structure, and embroidery direction all affect how the design should be digitized.
Underlay, sequencing, pull compensation, and stitch direction therefore need to be planned specifically for headwear.
Learn more in our Hat Embroidery Digitizing Guide.
Underlay for Small Embroidery Lettering
Small lettering is one of the easiest areas to over-digitize.
When letters become very small, there is limited physical space for needle penetrations.
Adding multiple layers of dense underlay underneath tiny satin letters can produce:
- Bulky lettering
- Thread buildup
- Thread breaks
- Distorted letters
- Poor readability
- Unnecessary machine penetrations
For this reason, small lettering may use a light center-run underlay or another minimal approach depending on its size and fabric.
The smaller the design becomes, the more carefully every stitch needs to be considered.
Underlay for Embroidered Patches
Patch embroidery frequently combines large fill areas with a strong satin border.
Different portions of the patch may therefore require different underlay strategies.
The interior fill may need a stable fill foundation, while the satin border may use edge-run and zigzag support.
The correct settings also depend on the patch material, backing, finished size, and border width.
Read our complete Embroidery Patch Digitizing Guide for more information about patch borders, stitch types, backing, sizing, and production preparation.
Underlay and Pull Compensation Work Together
Underlay cannot solve every embroidery problem by itself.
As embroidery stitches are placed into fabric, thread tension and repeated needle penetration can cause shapes to pull inward or distort.
Digitizers use pull compensation to help compensate for this movement by adjusting appropriate stitch areas beyond the original artwork boundaries.
Underlay helps stabilize the fabric while pull compensation helps preserve the intended dimensions of the visible embroidery.
Both settings should be considered together.
Increasing stitch density alone is usually not the correct solution for gaps or distortion. Excessive density can create additional tension and make embroidery problems worse.
How to Choose the Right Embroidery Underlay
Step 1: Identify the Stitch Type
First determine whether the embroidery object will use:
- Running stitch
- Satin stitch
- Tatami or fill stitch
- Another decorative stitch type
Step 2: Check the Object Width
A very narrow satin column requires a different foundation than a wide satin border.
Using heavy underlay inside a narrow object can cause unnecessary stitch buildup.
Step 3: Consider the Fabric
Before digitizing, determine whether the design will be stitched on:
- Cotton
- Denim
- Polo fabric
- T-shirt knit
- Fleece
- Towel
- Cap
- Jacket
- Performance fabric
This is one reason professional embroidery digitizers often ask what garment or material will be embroidered before preparing the final stitch file.
Step 4: Consider the Design Size
A logo digitized for a large jacket back cannot always simply be reduced to a small left-chest size.
As the design changes size, satin widths, fine details, density, underlay, and lettering may also need adjustment.
Step 5: Check the Stitch-Out
Embroidery digitizing should ultimately be evaluated as embroidery—not only as artwork displayed on a computer screen.
A test stitch-out can reveal problems such as:
- Puckering
- Gaps
- Excessive density
- Uneven satin borders
- Misaligned outlines
- Poor small lettering
- Insufficient fabric stabilization
Common Embroidery Underlay Mistakes
Using the Same Underlay for Every Object
A design may contain small lettering, wide satin borders, fine details, and large fill areas. These objects should not automatically receive identical underlay settings.
Adding Too Much Underlay
More stitches do not automatically create better embroidery.
Too much underlay may make a design stiff, heavy, bulky, or unnecessarily dense.
Using Too Little Underlay
Insufficient support can allow fabric movement, poor edge definition, sinking stitches, or visible gaps.
Ignoring the Fabric
A design prepared for stable woven material may behave differently when stitched on stretchy or textured fabric.
Increasing Density Instead of Fixing the Foundation
When embroidery coverage looks poor, beginners sometimes increase top-stitch density immediately.
However, the real problem may involve underlay, stabilizer, pull compensation, stitch direction, fabric texture, or a combination of these factors.
Can Automatic Underlay Be Used?
Modern embroidery digitizing software can automatically generate underlay based on selected settings.
Automatic underlay can provide a useful starting point when appropriate object and fabric settings are selected.
However, experienced digitizers still review the resulting stitches and adjust individual objects when necessary.
A logo containing tiny letters, large satin elements, fine details, and filled backgrounds may require different settings across different parts of the same design.
Do You Need Underlay for Every Embroidery Object?
No.
Not every embroidery object requires underlay.
Some small running-stitch details may not need it, while narrow satin elements may require only minimal stabilization.
Large fills, wider satin columns, stretchy fabrics, textured materials, and demanding logo elements may require substantially more support.
The correct choice depends on:
- Stitch type
- Object size
- Fabric
- Thread
- Design construction
- Stabilizer
- Machine setup
Why Professional Embroidery Digitizing Matters
Converting an image into an embroidery file involves much more than changing a JPG or PNG into DST, PES, JEF, or another machine format.
A properly digitized embroidery design contains instructions controlling stitch type, stitch direction, sequence, density, underlay, pull compensation, trims, color changes, and other production details.
If you have a logo or custom artwork that needs to be converted into a production-ready embroidery file, register with EmbroideryDigitize and submit your design requirements.
Already have an account? Log in to your EmbroideryDigitize account to place or manage your order.
You can also learn more about the process in our Embroidery Digitizing Services Guide.
Frequently Asked Questions
What is the purpose of underlay in embroidery?
Underlay creates a supporting layer of stitches beneath the visible embroidery. It can stabilize fabric, improve edge definition, support satin and fill stitches, reduce distortion, and improve overall stitch quality.
What is the best underlay for satin stitch?
The appropriate choice depends on the width of the satin column, fabric, and design. Narrow satin elements may use center-run underlay, while wider satin areas may use combinations such as edge run and zigzag.
What is edge-run underlay?
Edge-run underlay places running stitches near the inside perimeter of an embroidery object. It helps stabilize the shape and create cleaner edges underneath the final stitches.
What is zigzag underlay used for?
Zigzag underlay is commonly used beneath medium or wide satin columns. It provides internal support and can help create better coverage and lift.
Does small embroidery lettering need underlay?
Sometimes, but the amount should be carefully controlled. Small lettering may use lightweight center-run underlay or another minimal approach depending on letter size, satin width, fabric, and design construction.
Can too much underlay cause embroidery problems?
Yes. Excessive underlay can increase stitch count, create bulk, make the design stiff, and produce unnecessary thread buildup.
Is embroidery underlay the same as stabilizer?
No. Underlay is part of the embroidery stitch file and is stitched by the embroidery machine. Stabilizer is a separate backing material placed with the fabric to support it during embroidery.
Does changing the fabric require different underlay?
Often, yes. Stretchy, textured, lightweight, and stable fabrics behave differently during embroidery, so underlay and other digitizing settings may need adjustment.
Final Thoughts
Underlay may be hidden underneath the finished embroidery, but it can have a major effect on how professional the final design looks.
The correct underlay can improve stability, coverage, lettering, satin borders, and overall stitch quality. Incorrect settings can contribute to excessive density, distortion, gaps, or poor-looking embroidery.
The goal is not to use as much underlay as possible. The goal is to use the right type and amount of underlay for each embroidery object and fabric.
When underlay, density, stitch direction, pull compensation, sequencing, and fabric preparation work together, the result is cleaner and more production-ready embroidery.
Need a Logo or Custom Design Digitized?
Turn your logo, artwork, or custom design into a production-ready embroidery file.
Create your free EmbroideryDigitize account and submit your artwork, required size, garment type, and preferred embroidery format.
Existing customer? Login here.
If you already have an embroidery file but need another machine format, use our Free Embroidery Format Converter to convert supported embroidery files online.